Laser Mapping for Visual Inspection and Measurement
Originating Technology/NASA Contribution
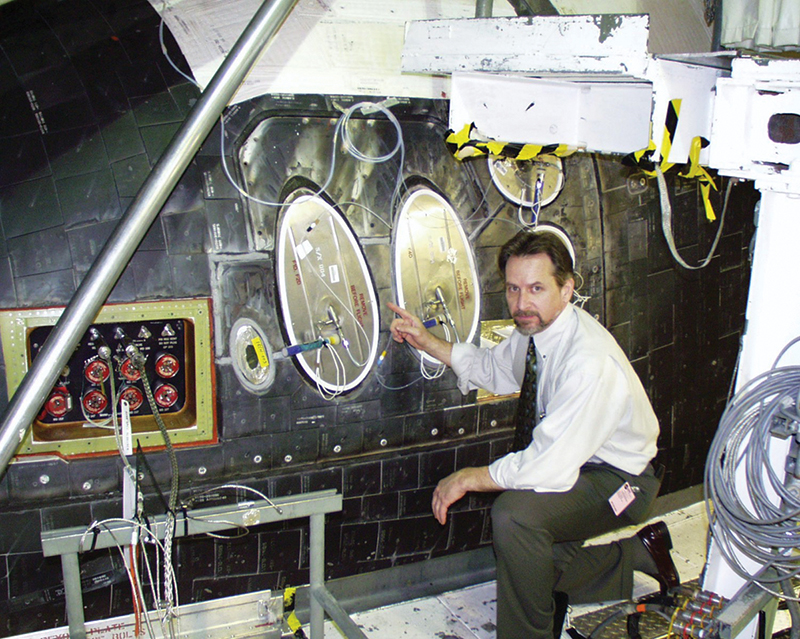
Each space shuttle orbiter has 38 Primary Reaction Control System (PRCS) thrusters to help power and position the vehicle for maneuvers in space, including reentry and establishing Earth orbit. Minor flaws in the ceramic lining of a thruster, such as a chip or crack, can cripple the operations of an orbiter in space and jeopardize a mission. The ability to locate, measure, and monitor tiny features in difficult-to-inspect PRCS thrusters improves their overall safety and lifespan.
These thrusters have to be detached and visually inspected in great detail at one of two NASA facilities—the White Sands Test Facility or the Kennedy Space Center—before and after each mission, which is an expense of both time and money.
Partnership
Laser Techniques Company, LLC (LTC), of Bellevue, Washington, builds customized laser-based measurement and inspection devices to help improve the safety, reliability, and useful life of high-value, safety-critical equipment and industrial machinery for the commercial, defense, and aerospace industries.
In 2002, James Doyle, president of LTC, successfully demonstrated that a miniature, high-performance laser could locate and map hidden flaws in PRCS thrusters that were smaller than the head of a pin, to an accuracy of 0.0003 inches.
Through the NASA-sponsored Montana State University TechLink Center, Doyle delivered a presentation of his work at White Sands, which led to the issuance of a NASA contract to build a full-scale, portable, in situ thruster mapping system.
The project was successful, resulting in the development of an automated laser-based scanning system that included a miniature, high-performance laser sensor. With the scanning laser system, the area of a thruster can be quickly inspected and mapped, providing technicians with accurate 3-D data for evaluating the ceramic surface condition. The portable laser scanner system was sent to White Sands, where it is used in thruster life-testing projects and routine thruster overhaul and refurbishment programs.
NASA is interested in extending the use of LTC’s portable scanning system to on-shuttle applications, enabling inspectors to detect and map flaws in the lining of the thrusters while they are attached to the shuttle. This would be a significant improvement over the current visual methods of inspection, which require removal and shipping of the thrusters.
The successful results of the thruster mapping project resulted in positive exposure of LTC’s capabilities to other branches of NASA. Working with the technical staffs of NASA; the United Space Alliance, of Houston; and Hamilton Sundstrand Corporation, of Windsor Locks, Connecticut, LTC developed an automated, laser-based corrosion mapping system for the gas generators used in the auxiliary power units on both the solid rocket boosters and the main orbiter. This system, which is being put into full production this year, will eliminate the laborious and difficult task of measuring corrosion and pitting on the external surface of the gas generator units.
A significantly more difficult challenge was then presented to LTC by the same group of NASA researchers. As Doyle recalls, “They basically said ‘Okay, you did a great job on the external surface of the gas generator unit, but can you build a microsensor that maps the inside surface of the gas generator injector stem? Oh, by the way, its inner diameter is only 0.095 inches, and it is only 3 inches deep!’”
The inside surface of the injector stem is the most difficult area to inspect. Eve n tiny flaws in the gas generator can result in the condemnation of these expensive parts, and since they are considered flight critical, no flaws can be allowed.
Approximately 4 months after receiving a contract to develop a proof-of-principle gas generator stem-mapping sensor, LTC notified NASA that it was ready to demonstrate the device.
Not only was LTC ahead of schedule, the sensor exceeded the design goals, providing high-resolution, 3-D images of pits as small as 0.005 inches deep. It will be put into full production for inspection of all gas generators during the refurbishment process at the Hamilton Sundstrand facility, in Rockville, Illinois. This system, which will be capable of mapping both the gas generator external surface and the injector stem, will significantly improve the inspection process by automating the onerous task of manually inspecting these critical parts.
The TechLink center provides assistance for small businesses, such as LTC, to get exposure to NASA and the U.S. Department of Defense—a task that is otherwise particularly difficult for small businesses. For LTC, that is all it needed.
To date, LTC has successfully introduced its technology to NASA’s Marshall Space Flight Center, Glenn Research Center, White Sands Test Facility, and Kennedy Space Center.
Product Outcome
The developments accomplished through the projects conducted for NASA are being directly extended to the commercial industry and for military defense applications. Conventional visual inspection and measurement methods can be time-consuming, laborious, and inaccurate. “Our objective,” stated Doyle, “is to eliminate the possibility of missing a potentially crucial flaw due to the effects of operator subjectivity, visual acuity, or fatigue.”
LTC’s laser-based scanning measurement and inspection systems, advanced under the NASA contracts, are ideal and cost-effective solutions to these problems. Their small size allows them to scan otherwise inaccessible areas, and they can map virtually 100 percent of a target surface in a matter of minutes. In addition, the unique LaserVideo image dataset from the laser-scanning probe provides valuable qualitative visual information about surface condition. These laser-generated visual images provide nearly photographic image quality of surfaces that would be impossible to photograph using conventional bore scopes, and expose flaws such as scratches, scuffs, and discoloration.
LTC offers a variety of noncontact measurement and inspection solutions using laser-based sensors. For inspection of critical components, LTC has developed a wide range of products based on three core technologies: laser profile mapping, LaserVideo imaging, and Laser-Scanned Fluorescent Penetrant Inspection (LSPI). All of the company’s technologies are supported by its Laser MicroMap data acquisition system and utilize its LaserViewer software for flexible data acquisition, real-time display of collected data, and data analysis. It has developed a standard product line to meet the needs of a number of diverse applications, and can, as it proved with the variety of work it performed for NASA, quickly adapt those products to new requirements.
Laser profile mapping involves a group of sensors that provide precise, noncontact measurement and 3-D images of tubes, bores, plates, and complex surfaces. These sensors are high-resolution “laser calipers” that take a rapid succession of single-point distance measurements while scanning over the target surface. The result is a 3-D image that provides a quantitative map of the inspected part. Features such as pits, erosion, and deformation can be rapidly located and accurately measured. LTC also develops systems that integrate eddy current sensors, complementary nondestructive testing technology that can detect subsurface flaws.
With LaserVideo imaging, a highly focused laser spot provides high-resolution, undistorted images of hard-to-access surfaces such as tubes and bores, revealing features like cracks, scratches, stains, and variations in surface roughness. These images are acquired along with the profile data and provide a visual image that complements the topographical data set.
The patented LSPI technique provides automated fluorescent penetrant inspection for real-time detection and mapping of surface-breaking cracks and other defects. Like LaserVideo imaging, this noncontact inspection method is ideal for detecting surface defects in difficult-to-access components.
Using these three core technologies, LTC offers an in-house laser inspection service, as well as a fully equipped laboratory, including multi-axis, computer-controlled scanning fixtures; optical breadboard tables; and a full cadre of test instruments and sensors. The company can quickly set up and test samples that clients provide for evaluation. It also offers remote or onsite consulting to customers, to develop solutions for challenging inspection and measurement applications.
LTC practices its trade in the defense, aerospace, and energy industries. Defense applications of this laser-sensing technology include detecting and mapping erosion, deformation, and pitting in weapons ranging from small caliber rifles, to mortars, to large caliber cannons. Aerospace applications, in addition to detecting chips in the space shuttle thrusters, include detecting cracks in aircraft engine parts and measuring thruster erosion. In the energy industry, this technology is useful for dent measurement, quality measurement, and crack detection in nuclear steam generator tubes, and underwater mapping of piping.
LaserVideo™, LSPI™, and Laser MicroMap™ are trademarks of Laser Techniques Company, LLC.
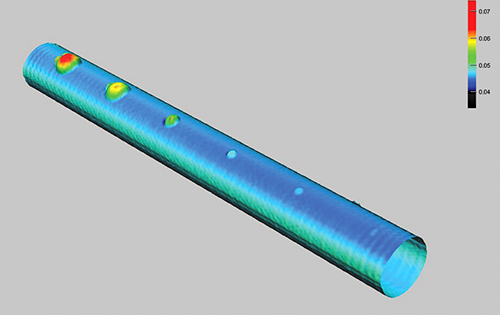
A 3-D image of corrosion generated using the laser sensor developed under the NASA-funded partnership.

James Doyle, Laser Techniques Company, LLC, president, kneels to examine the thrusters on Space Shuttle Atlantis.

